Goal: In this experiment/demo students would reproduce the experiment done by Rosalind Franklin that showed that the structure of the DNA molecule was a double helix. However, the students will be using light rather than x-rays and a helical tungsten filament rather than DNA.
Background:
One of the most useful ways to understand how something works is to look at its structure. This is why the discovery of the helical structure of DNA started a DNA revolution that would last the next 50 years. Knowing the structure of DNA allowed us to understand how genes work and how they are replicated from one cell to another for generations. It allowed us to better understand inherited diseases and how one single change or mutation could lead to those diseases. Knowing the structure of DNA lead to DNA fingerprinting, which has revolutionized forensic sciences by matching DNA samples to crime suspects, and can also be used to determine the paternity or ancestry of humans or pets. Recently, new developments in DNA technology (including cutting edge CRISPR technology) could lead to gene editing and gene therapies. But, this all started with determining the structure of DNA. Back in the 1800’s, scientists knew about genetic traits, but it wasn't until 1943 that they learned that DNA was the "genetic factor" and not until 1953 that the helical structure of DNA that we know today was described.
While the discovery of the structure of DNA involved four scientists, many scientific breakthroughs had to occur for the structure of DNA to be found. Some of these include: 1) the progress made by X-ray crystallographers in studying organic macromolecules; 2) the growing evidence supplied by geneticists that it was DNA, not protein, in chromosomes that was responsible for heredity; 3) Erwin Chargaff’s experimental finding that there are equal numbers of A and T bases and of G and C bases in DNA; and 4) Linus Pauling’s discovery that the molecules of some proteins have helical shapes—arrived at through the use of atomic models and a keen knowledge of the possible disposition of various atoms. However, the most important scientific breakthrough was a photograph, photograph 51, which was taken by Rosalind Franklin and her student.
In 1951, Franklin was offered a 3-year research scholarship at King's College in London to set up and improve the x-ray crystallography unit there. X-ray crystallography is a biophysical technique where scientists make crystals of molecules and shine x-rays on them. The x-rays diffract and the diffracted pattern can be used to reconstruct the molecule’s structure. DNA is too small to be seen with the naked eye, but using x-ray crystallography, we can determine the positions of all the atoms in the DNA, and thereby generate a 3D model based on those observations.
When Franklin arrived at King’s College, Maurice Wilkins was already using X-ray crystallography to try to solve the structure of DNA. It turned out that Franklin arrived while Wilkins was away, and on his return, Wilkins assumed that she was hired to be his assistant. It was a bad start to a relationship that never got any better. However, pushing forward, Franklin and her student, Raymond Gosling, were able to use X-ray crystallography to get high-resolution photographs of crystallized DNA fibers, including photograph 51. From photograph 51, she deduced the basic dimensions of the DNA strand and that it was a helix.
She presented her data at a lecture in King's College at which James Watson was in attendance. Watson admitted to not paying attention at Franklin's talk and not being able to fully describe the lecture and the results to Francis Crick. Watson and Crick had been working on solving the DNA structure. Franklin did not know Watson and Crick as well as Wilkins did and never truly collaborated with them. It was Wilkins who showed Watson and Crick the X-ray data that Franklin had obtained. The data confirmed the 3-D structure that Watson and Crick had theorized for DNA. In 1953, both Wilkins and Franklin published papers on their X-ray data in the same Nature issue with Watson and Crick's paper on the structure of DNA.
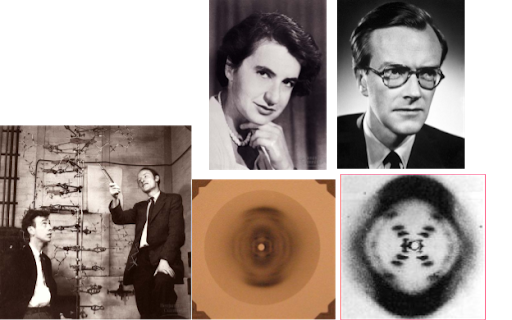
Figure 1 Top: a picture of Rosalind Franklin and Maurice Wilkins. Bottom left to right: Picture of Watson and Crick with their 3D model of DNA, The first X-ray diffraction picutre of DNA and Rosalind Franklin's DNA Photograph 51.
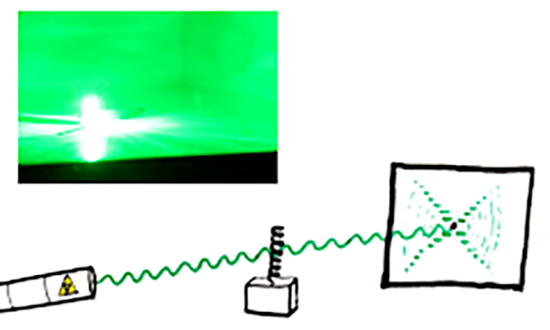
In this experiment, you will use some household items to reproduce the photograph that launched a DNA revolution, photograph 51. However, instead of a DNA molecule, you will use a filament from an incandescent light bulb, which has a helical shape. Instead of x-rays, you will shine visible light from a laser pointer on the filament. Looking at the diffraction pattern of the filament on a wall, you will be able to see the characteristic “cross pattern” that is also shown in photograph 51
Parts List
-
A small helical structure (I got mine from an old incandescent light bulb)
-
Laser pointer (make sure it is not and LED one, I got mine from a pet store)
-
White paper
Notes
Tungsten filament from the light bulb is helical just like DNA
The laser pointer will act as our X-ray beam
The white paper will be our x-ray film
Directions
Safety Precautions:
-
Even though it is a laser pointer and not an x-ray beam, avoid direct exposure to the beam
-
Do not stare into the beam
-
Do not view the beam through optical instruments (this includes your camera phone)
Experiment
-
Make sure that your laser is aligned with the filament.
-
Use a leveled surface for support
-
Shine the laser into the tungsten filament as shown in the picture below:
-
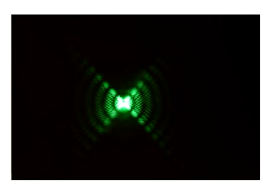
Try to get a picture similar to the one below ( you can dim the lights in the room):
-
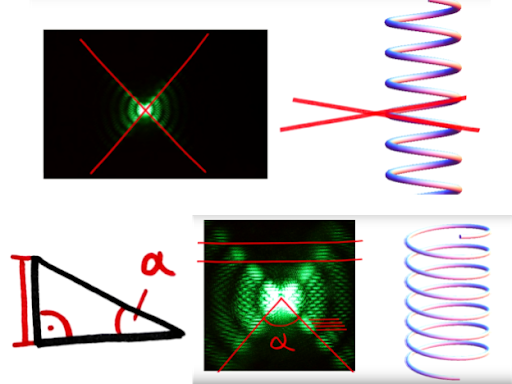
Have a partner carefully draw the pattern on the paper. It does not have to be perfect.
-
Scientists measure the space in between the spots to calculate the size of the helix. This is why a good look at photograph 51 gave away the structure! They had already since helical structures before (they knew helical proteins). The spacing in between the spots could be measured and it gave away that the there would be no steric constraints if the phosphates were on the outside.
-
What it should look like
Extras - other things you could do
You can find other patterns to explore and learn. Try other shapes and see what you can learn from the different diffraction patterns. You can see more diffraction pattern calculations here.